Background
Over the past few months, I've dedicated my time to crafting Chrome extensions, facing occasional challenges while navigating through the official documentation. When starting the development journey of Break Reminder, my primary concerns were centered around mastering the fundamentals of building Chrome extensions, understanding new syntaxes within the Chrome runtime library, and handling communication between background workers and the frontend client. However, as the app's scale expanded, I realized that establishing communication with an external database was imperative to enhance the user experience.
Given the plethora of database-as-a-service options available online, I meticulously weighed the pros and cons of various services and ultimately chose Firebase for a few compelling reasons:
- Seamless integration into the Google ecosystem, particularly advantageous if you are already leveraging Google APIs.
- Well-documented features and robust user support.
My optimism stemmed from the hope that Firebase would offer adequate support for a Chrome extension (which, to some extent, it did).
Firebase Home Page
Step 1
The most straightforward approach to integrate Firebase into a Chrome extension involves creating a Firebase project at Firebase. Upon successful project creation, a firebaseConfig file is generated, resembling the following:
// $some_secret_value will be replaced by the actual values
const firebaseConfig = {
  apiKey: $some_secret_value,
  authDomain: $some_secret_value,
  projectId: $some_secret_value,
  storageBucket: $some_secret_value,
  messagingSenderId: $some_secret_value,
  appId: $some_secret_value,
  measurementId: $some_secret_value
};
Following this, navigate to the directory containing your Chrome extension and execute:
npm install firebase
Note: Firebase also provides an option to use CDN instead of npm.
<script type="module">
  // Import the functions you need from the SDKs you need
  import { initializeApp } from "https://www.gstatic.com/firebasejs/10.7.1/firebase-app.js";
  import { getAnalytics } from "https://www.gstatic.com/firebasejs/10.7.1/firebase-analytics.js";

  // Your web app's Firebase configuration
  // For Firebase JS SDK v7.20.0 and later, measurementId is optional
  const firebaseConfig = {
    apiKey: $some_secret_value,
    authDomain: $some_secret_value,
    projectId: $some_secret_value,
    storageBucket: $some_secret_value,
    messagingSenderId: $some_secret_value,
    appId: $some_secret_value,
    measurementId: $some_secret_value
  };

  // Initialize Firebase
  const app = initializeApp(firebaseConfig);
  const analytics = getAnalytics(app);
</script>
However, executing remote scripts like this might conflict with Chrome's security settings. In my experience, using npm is the recommended approach. If you prefer not to use npm, you can directly download the code from the provided link firebase-app and include it in your project.
Step 2
With the Firebase integration in place, the next step involves setting up your database in the Firebase console.
Step 2.1
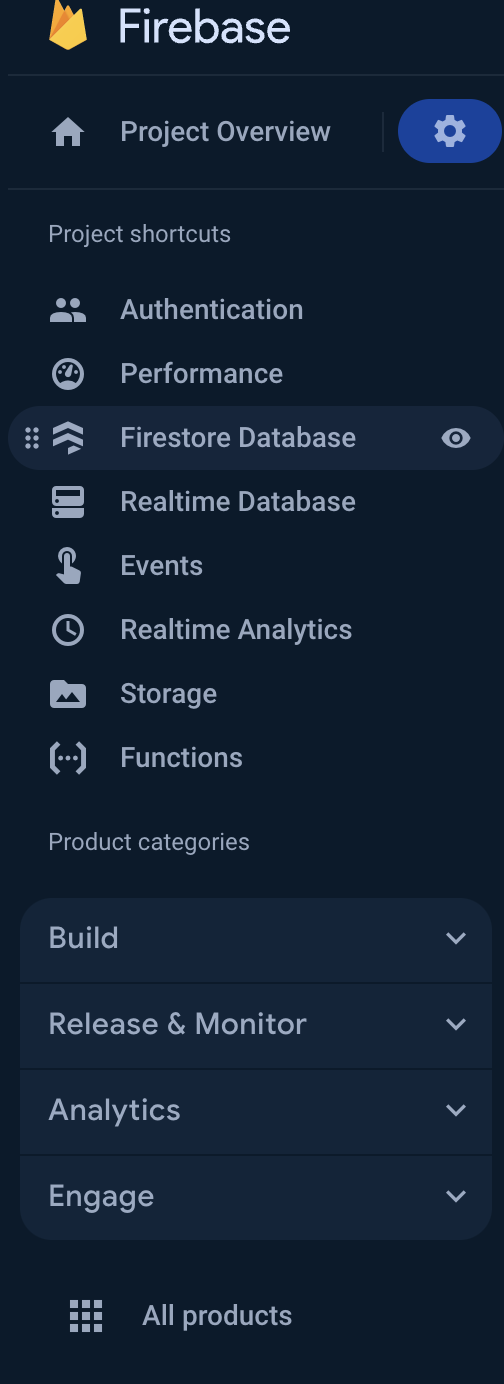
- Firebase Dashboard
- Click on Firestore Database
Step 2.2
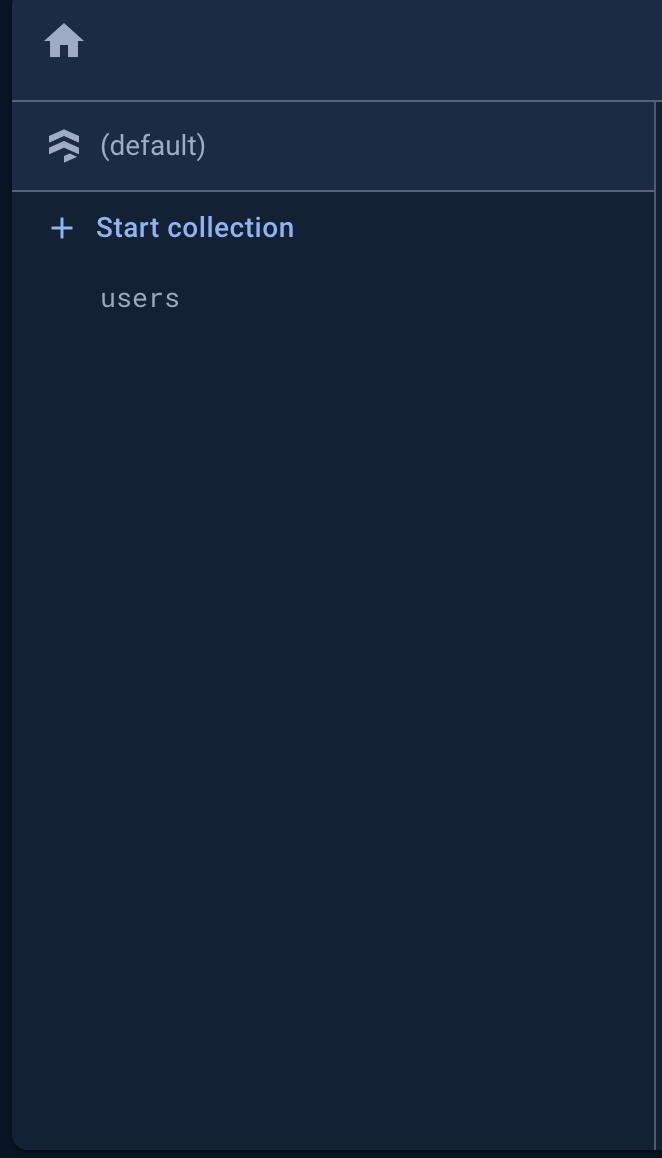
- Firebase Database
- Click on Start Collection and create a new collection.
- Note: While you can perform other actions from the dashboard, user authentication and real-time analytics pose challenges due to tightened rules in manifest v3.
Step 3
Now, let's delve into the system's architecture. You have three options for utilizing Firebase backend in your app:
- Directly use it in your client code, though this approach is highly insecure as it exposes all your API keys to the client. It's the easiest but not recommended.
- Leverage it in a remote server by renting a machine and using Firebase backend as a service to communicate with the frontend.
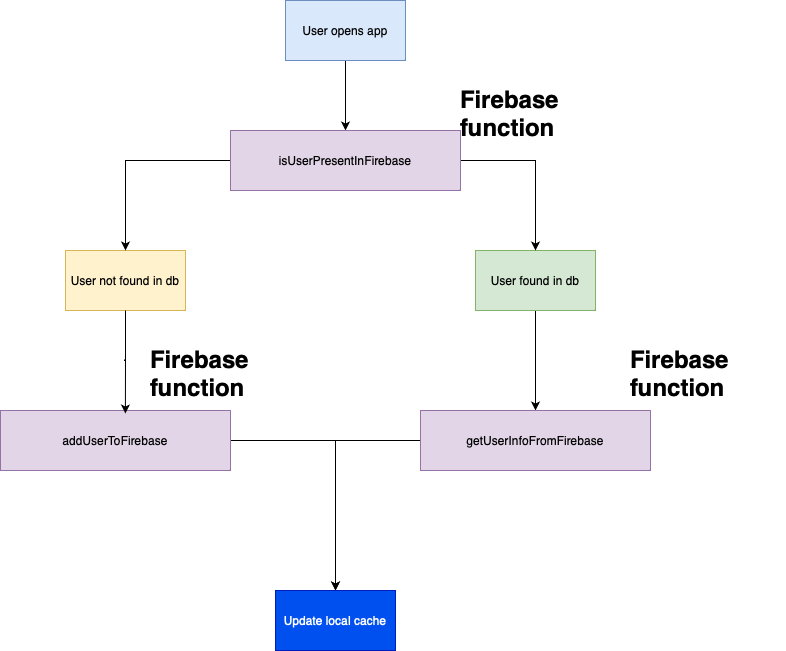
- Opt for Firebase functions, which is the path I chose. This is ideal for projects with minimal backend code complexity. In the case of Break Reminder, it stored user emails alongside the number of tasks they successfully completed in the database. The following outlines the high-level architecture of Break Reminder:
Step 4
Let's dive into the usage of Firebase functions. From the Firebase Dashboard, set up Firebase functions. Once completed, navigate to your Chrome extension directory and create a new folder named server (or any name depending on your use case).
cd server
npm install -g firebase-tools
If an error arises, try executing it with admin privileges:
sudo npm install -g firebase-tools
Now, initialize your project:
firebase login
Authenticate Firebase CLI via browser.
firebase init firestore
firebase init functions
Following these steps, you should have an index.js file within a functions directory. You can add code like the following:
const { onRequest } = require("firebase-functions/v2/https");
const { initializeApp } = require("firebase-admin/app");
const { getFirestore } = require("firebase-admin/firestore");

initializeApp();

exports.example = onRequest(async (request, res) => {
  const email = request.query.email;
  console.log(email);
  // Do something with email
  response.status(200).json({
    success: true,
  });
});
Execute the following in the console:
firebase emulators:start
Check the output for the URL of the HTTP function. It will look similar to http://localhost:5001/MY_PROJECT/us-central1/example. Open this URL in a new tab, appending the query string ?email=helloworld@gmail.com. You should see the email logged in the console, indicating that everything is functioning correctly.
Step 5
To deploy the code to production, run:
firebase deploy --only functions
This will upload your function to a Google Cloud server and provide a URL like:
https://us-central1-MY_PROJECT.cloudfunctions.net/example
You can use this URL to send HTTP requests from your Chrome extension client code, as demonstrated in the example:
async addUser(email) {
  const requestData = {
    url: "https://us-central1-MY_PROJECT.cloudfunctions.net/example?email=helloworld@gmail.com",
    method: "GET",
  };
  fetch(requestData.url, { method: requestData.method })
    .then((response) => response.json())
    .then((data) => {
      if (data.success) {
        // Handle success
      }
      return data;
    })
    .catch((error) => {
      console.log(error);
      // Handle errors
    });
}
And there you have it – you've successfully connected your Chrome extension to a reliable backend service using Firebase Cloud Functions. If you have any questions or need clarification, feel free to email me at gautamsharma2813@gmail.com.
Signing off,
-G